Been spending way too much time on social media platforms? Losing all your time scrolling through reels, memes, and other people’s posts on Instagram? If yes, then I know you must be wanting to take a little break from the platform. And well, I’ll help you do just that. So, in this article, I will tell you how to deactivate your Instagram in a few simple steps! You can follow these and take a step back from the gram!
Now, you must be thinking if deactivating Instagram is the ONLY way to take a break from the platform. I mean, there are other methods of restricting your time on the app as well, right? You can mute reels or posts from people who give you FOMO. If someone is giving you a hard time on the app, you’ve got the option to block them permanently or restrict their account to limit contact as well.
Table of Contents
Here’s How To Deactivate Your Instagram | Follow These Steps To Take A Break From The App!
But again, if these options don’t appeal to you, and you’ve really decided that you’re done with Instagram, then you can either delete your account permanently or deactivate it temporarily. However, I suggest that you first only try deactivating your account, because there’s no denying that life without Instagram– its crazy filters, unique features, viral songs, etc. can get quite dull.
Plus, deactivating your Instagram account will too give you the much-needed break. So, keep reading how to deactivate your Instagram account in a few simple steps and enjoy your time off the app!
How To Deactivate Your Instagram Using A Web Browser?

Oh, but have you wondered what actually happens when you deactivate your Instagram account? To give you a gist, when you choose to temporarily disable your account, your profile, the photos, videos, or reels that you’ve posted, all the comments that you’ve made will be hidden until the time you choose to reactivate your account.
Also, before we proceed any further, let me inform you that the below-mentioned steps will only work for Instagram accounts that aren’t connected with Facebook accounts. In other words, you can follow these steps only if you do not use your Facebook account to log in.
And, if you want to disable the account that uses your Facebook one, you’ll first have to detach the two accounts and then reset your Instagram account’s password. Also, if you wish to do this successfully, you must have access to the mail account that is connected to your Instagram account.
After you’ve met the above-mentioned requirements, follow these steps if you want to know how to deactivate your Instagram account:
- Open a web browser of your choice.
- Go to Instagram.com
- Log in to your Instagram account.
- Then, click on your profile picture located at the top right corner.
- From the drop-down menu that appears, select the Profile option.
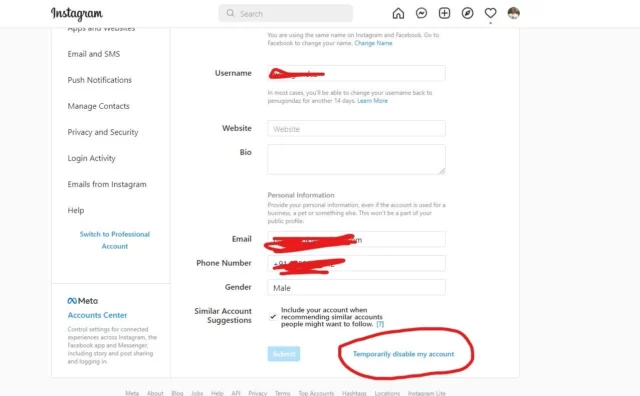
- At the top of the page, you’ll get the Edit Profile option. Click on it.
- Keep scrolling till the bottom of the page and you’ll find the Temporarily deactivate my account option there.
- Click on it.
- Instagram will then ask you for a reason for deleting your account.
- Pick a reason from the drop-down menu that fits your needs the best.
- In the next step, enter your password.
- Lastly, click on the Temporarily Deactivate Account option at the bottom of the page.
- Click on Yes to confirm the option that you’ve just chosen.
And, that’s it! Your Instagram account will now be disabled! If you want to access your account again, then you will have to login into your account again, but using a website. Also, there’s no time limit regarding how long you can keep your account deactivated. No, Instagram won’t delete your account even if you have had it disabled for a year or more.
Also, the above-mentioned process will only work using web browsers. Only iOS users can deactivate their Instagram accounts using the app version of Instagram.
How To Deactivate Your Instagram Using The App?

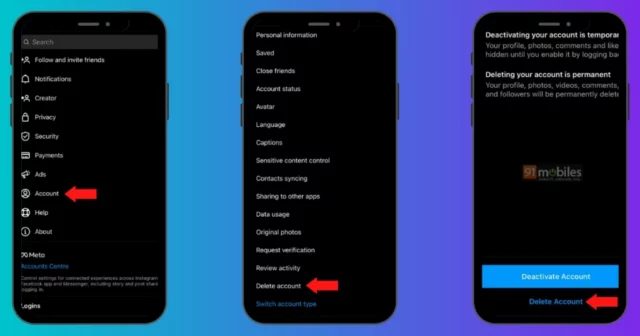
If you’re an iOS user, then you can follow the below-mentioned steps to deactivate your Instagram account:
- Open the Instagram app.
- Tap on your profile picture.
- Tap on the three horizontal bars at the top right.
- Then, tap on Settings
- From the options available, click on the Account option.
- Next, click on the Delete account option.
- Now, select the deactivate account option.
- Answer the questions that appear on your screen and tap on the Temporarily deactivate account option.
And, that’s it! Your Instagram account will now be deactivated!
Final Words
Alright, people! This was how to deactivate your Instagram account! In this article, I walked you through a few simple steps required for deactivating your account and taking a much-needed break from the gram! The experience is pretty rewarding in its own sense, but not talking to your followers and friends can get pretty lonely. So, be ready for experiencing those Instagram blues! Also, if you’ve got any doubts regarding the above-mentioned steps, feel free to mention them in the comments!
How long can you deactivate Instagram?
For Instagram, you can keep your account disabled for as long as you like, whether that be 10 months or 10 days. The only restriction Instagram has regarding disabling your account is that you can’t do it more than once a week.
Does deactivating Instagram delete followers?
No, deactivating Instagram doesn’t delete followers. All of your information temporarily disappears from Instagram and your followers are unable to unfollow you because they won’t be able to find your account. You also won’t be able to follow or unfollow people while your account is deactivated.
What happens when you deactivate Instagram permanently?
If you delete your account, your profile , profile, photos, videos, comments, likes and followers will be permanently removed. You can’t sign up again with the same username or add that username to another account. Deleted accounts cannot be reactivated.
Why is Instagram disabling 2022?
Accounts that don’t follow Instagram’s Community Guidelines may be disabled. If you think your account was disabled by mistake, you may be able to ask the support center to review the decision by opening the app, entering your username and password, and following the on-screen instructions.


